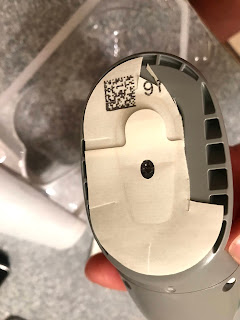
At the end of 2019, Dexcom changed their adhesive formula for their G6 continuous glucose sensors (CGM). The changes are all approved by the FDA and contain "medical-grade, pressure sensitive acrylic-based adhesives" like the previous patch. Both the old and updated adhesive formulas passed biocompatibility and irritation testing and are not manufactured with latex, isobornyl acrylate (IOBA), phthalates, colophonim, or 12 other commonly known skin irritants. The adhesive was tested in several clinical studies prior to release.
But at the end of the day, the adhesive change (which was intended to improve the wear time of the sensors) has caused skin reactions and adhesive burns on a subset of users. As one of those users, let me tell you, it is really awful.
Adhesive reactions can manifest as localised redness, bumps and itchiness, and blisters, all the way up to full-fledged chemical burns. (I'm not embedding these reaction photos in this post because they're really graphic). Basically, they suck and tend to get worse with continued exposure to the adhesive that's causing the irritation. Besides discontinuing use of the CGM causing the reaction and/or rotating the insertion site to a different location, there are some steps you can take to help prevent reactions from happening. Steroid creams can help get reactions to go down faster, so I'd also talk to your doctor about your adhesive reactions.
Because my body does nothing halfway (I've been told by high-up folks at Dexcom that I have the worst reaction they've seen), I've slowly developed (with help from the internet and Dexcom's own suggestions for dealing with adhesive reactions) a method for preventing adhesive reactions.
Depending on severity of the reaction, you can build up to whatever combination of barrier wipes and films you need.
Mild Reactions (redness, small bumps, itchiness)
Start with an over-the-counter fluticasone propionate nasal spray like Flonase. Spray it onto your clean skin and spread it evenly. Let dry completely before applying a second barrier wipe (IV Prep or Skin Prep are good). Skin Tac is a duel-purpose wipe — it serves as both a barrier and an adhesive wipe.
Moderate to Severe Reactions
If reactions persist, inserting through a barrier film such as Tegaderm, in addition to the barrier wipes described above, is often sufficient to overcome reactions. If Tegaderm isn't enough, it's time to try a hydrocolloid barrier.
The main difference between barrier films like Tegaderm and hydrocolloid barriers like DuoDerm is that hydrocolloid barriers are impermeable, whereas barrier films will allow some air flow. The catch is, both barrier films and hydrocolloid barriers tend to not stick super well long-term, so adhesive wipes like Skin Tac are highly recommended. I strongly suggest using an over patch if you use a hydrocolloid barrier, since they really don't stick well on their own.
Severe Reactions, aka the nuclear option
At the end of the day, the best way to minimise adhesive reactions is to remove as much of the offending adhesive as possible from the equation. This means trim the excess adhesive from around the sensor prior to inserting.
------------------------------------------------------------------------------
Amy's Step-by-Step Guide to Avoiding Adhesive Reactions
The tool kit (left to right): alcohol swab, Flonase, Skin Prep barrier wipe, Skin Tac, DuoDerm (hyrocolloid barrier), Dexcom G6, Skin Grip over patch.
Step 6. Apply Skin Prep barrier film to entire area. Let dry completely.
------------------------------------------------------------------------------
A few additional notes
I strongly recommend contacting both Dexcom (or whoever your sensor manufacturer is) and the FDA every time you have an adhesive reaction. Part of this is a bit of a "fuck you" to Dexcom, but also a favour to everyone else, since it creates documentation of the issues and, theoretically, can be used to motivate changes to the adhesive formulas.


No comments:
Post a Comment